Creative Pallet Projects for Home and Garden Décor
Table of Contents
Introduction

Want to transform your space without breaking the bank? Let’s talk about creative pallet projects – seriously, these things are everywhere right now, and for good reason! I’ve been obsessed with these wooden gems lately, and I’m telling you, they’re perfect for anyone who wants to add some character to their home or garden without spending a fortune. Whether you’re dreaming of a cozy garden setup or looking to jazz up your living room, pallet DIY projects are your new best friend.
Why Everyone’s Going Crazy for Pallet Projects in 2026
Okay, so here’s the thing – pallet garden DIY projects aren’t just trendy, they’re actually genius. We’re all trying to be more eco-friendly these days, right? Well, repurposing old pallets is like giving Mother Earth a high-five while making your space look amazing. Plus, let’s be real – who doesn’t love free (or super cheap) materials? Make your DIY projects easier and more fun.
I love how pallet furniture has this whole rustic, “I-totally-meant-for-it-to-look-this-weathered” vibe going on. It’s like shabby chic but without the hefty price tag. And here’s a secret: even if you mess up a little, it just adds to the character! No one’s gonna know that wonky corner wasn’t intentional.
The best part? You don’t need to be some DIY wizard to pull these off. I mean, I once tried to assemble IKEA furniture and nearly had a breakdown, but pallet projects? They’re actually doable. The pallets are already the right size, and they’re built tough – these things were literally made to carry heavy stuff around warehouses!
Fun Outdoor Projects That’ll Make Your Neighbors Jealous
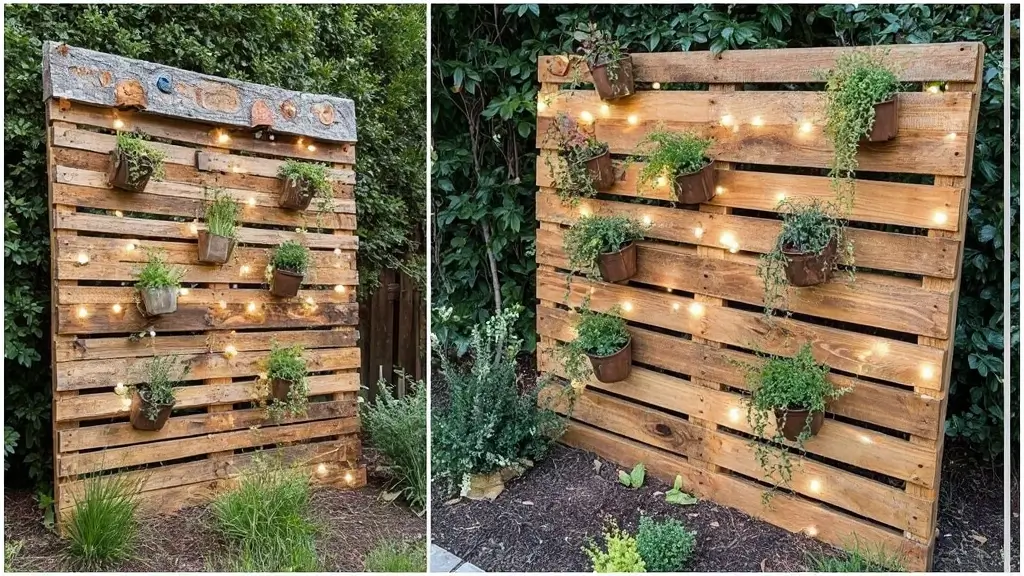
Vertical Garden Planters (AKA Your New Green Wall)
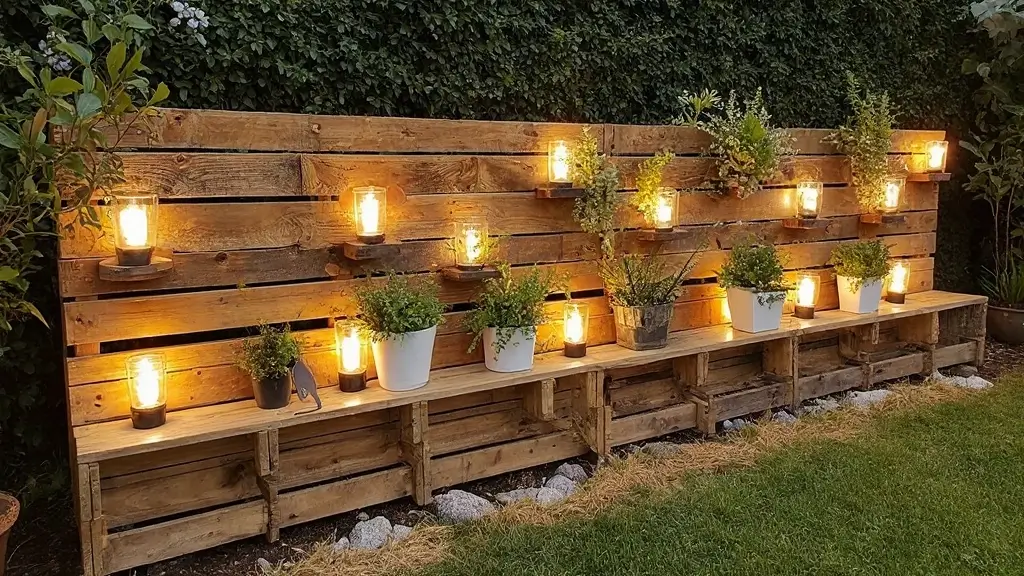
Oh my gosh, pallet garden DIY planters are probably my favorite thing ever! Picture this: you’ve got this boring fence or wall, and BAM – suddenly it’s a living, breathing garden masterpiece. I’m not even exaggerating here.
How Easy Is It? Super easy – like, “I-can-do-this-with-my-morning-coffee” easy
What You’ll Need: A drill, staple gun, some landscape fabric, and sandpaper
Time: Honestly? A lazy Sunday afternoon (2-3 hours tops)
Here’s what you do: grab a decent pallet (make sure it says “HT” on it – that means it’s heat-treated and safe), give it a good sanding (trust me on this, splinters are not cute), and staple some landscape fabric on the back. Fill those little pockets with soil, pop in your favorite plants, and voilà! You’ve got yourself a vertical garden that’ll make everyone think you’re some kind of green-thumb genius.
I planted herbs in mine, and now I literally just step outside and grab fresh basil for my pasta. It’s the little things, you know?
Outdoor Seating That Actually Looks Expensive
Let’s talk about pallet furniture for a sec – specifically seating that won’t make your wallet cry. I’ve seen outdoor furniture sets that cost more than my car payment, and honestly? This DIY version looks just as good.
Difficulty Level: You’ll need to use some power tools, but nothing scary
What You’ll Need: Saw, drill, screws, and some comfy cushions
Time: Weekend project vibes (4-6 hours)
Stack a couple pallets, screw them together, add a backrest, and boom – instant outdoor lounge. The trick is in the cushions, though. Splurge a little on weather-resistant ones, and suddenly your DIY bench looks like something from a fancy patio catalog. I covered mine with outdoor fabric that matches my garden, and people always ask where I bought it!
Herb Gardens That Actually Fit on Your Balcony
Living in a small space? These vertical herb gardens are life-changers! Seriously, if you’ve got a tiny balcony or just a sunny wall, you can still grow your own fresh herbs. It’s like having a mini farmer’s market right outside your door.
Difficulty Level: Perfect for beginners
What You’ll Need: Drill, good potting soil, and your favorite herbs
Time: Afternoon project (2-4 hours)
Lean your pallet against the wall at a slight angle – this helps with drainage and makes it easier to water. Then just plant away! I’ve got basil, oregano, rosemary, and mint in mine. Fair warning though: mint takes over everything, so maybe give it its own section unless you want a mint jungle (which, honestly, doesn’t sound terrible).
Indoor Projects That’ll Upgrade Your Instagram Game
Wall Shelves with Serious Character
Indoor pallet furniture isn’t just about big pieces – these wall shelves are absolute game-changers. They’re like floating shelves, but with way more personality and way less cost. you might also like our guide on How to Build a Raised Garden Bed easy.
Difficulty Level: You’ll need to be comfortable with a saw and level
What You’ll Need: Level, wall anchors, saw, and whatever finish you like
Time: An evening project (3-4 hours)
Take apart your pallet carefully (this is oddly therapeutic, by the way), sand everything smooth, and mount the boards as shelves. I stained mine a rich walnut color, but my friend painted hers bright white for a more modern look. Both turned out amazing! The key is making sure they’re level – trust me, wonky shelves are not the kind of character you want.
Coffee Tables That Start Conversations
I cannot tell you how many compliments I get on my creative pallet projects coffee table. It’s honestly become the star of my living room, and I made it for less than $30!
Difficulty Level: You’ll need some patience, but it’s totally doable
What You’ll Need: Router (or just lots of sandpaper), wood glue, maybe some wheels
Time: Weekend warrior project (6-8 hours)
Stack two pallets, sand the heck out of the top (seriously, don’t skip this step unless you want your guests picking splinters out of their drinks), and seal it with a good finish. I added wheels to mine so I can move it around easily. The storage space inside is perfect for hiding all the remotes, magazines, and random stuff that usually clutters up the coffee table.
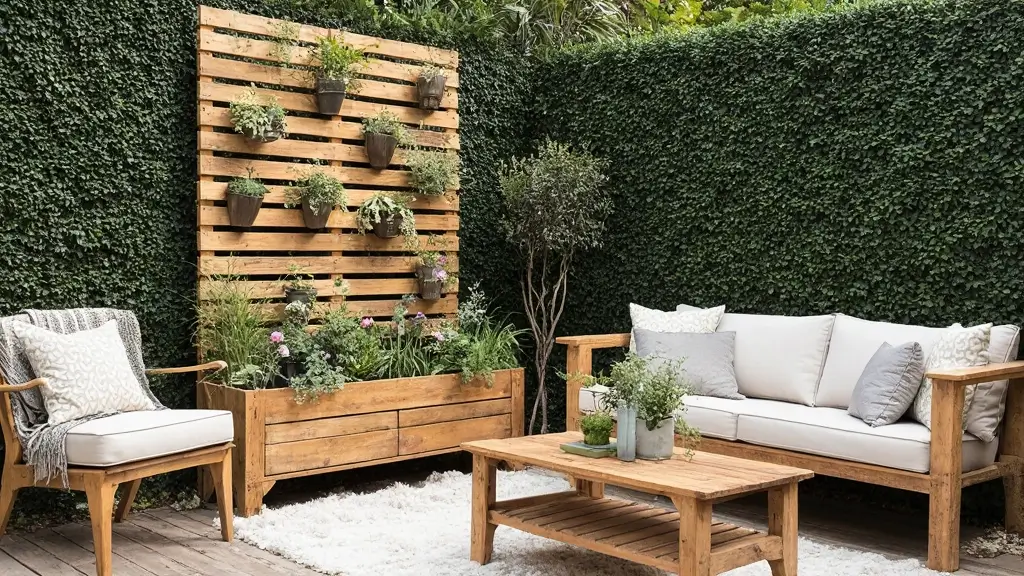
Room Dividers for Open Floor Plans
Got one of those open floor plans that’s great in theory but makes it feel like you’re living in a fishbowl? Pallet room dividers to the rescue! They give you privacy without making your space feel cramped.
Difficulty Level: This one’s a bit more involved
What You’ll Need: Hinges, some creativity, maybe fabric or string lights
Time: Weekend project plus some (8-10 hours)
Connect pallets with hinges so you can fold them up when you don’t need them. I added some fairy lights and trailing plants to mine, and it looks like something out of a design magazine. My friend hung fabric panels on hers for a softer look. The possibilities are endless!
Real Talk: Tips That Actually Matter
Don’t Skip the Safety Stuff (Seriously)
Before you get all excited and start building, take a minute to check your pallets. Look for that “HT” stamp I mentioned – it means they’re safe to use. Avoid anything marked “MB” or mystery pallets with no markings. I learned this the hard way when I grabbed a random pallet and later found out it might’ve been treated with chemicals. Not fun.
Also, sand everything. I mean everything. Your future self will thank you when you’re not picking splinters out of your hands for the next week.
Make It Last Without Breaking the Bank
For outdoor stuff, you’ve gotta protect your creative pallet projects from the weather. A good outdoor stain or sealer is totally worth the investment – think of it as insurance for your hard work. Indoor pieces can get away with a nice polyurethane finish that’ll keep them looking fresh.
I’ve made the mistake of skipping the finish on an outdoor piece, and let’s just say it didn’t age gracefully. Learn from my laziness!
Making Your Projects Look Like They Belong
Color Coordination (Or: How Not to Look Like a Hot Mess)
Here’s something I wish someone had told me: think about how your new garden décor ideas will look with what you already have. My first pallet planter was this bright turquoise that clashed horribly with everything else in my garden. Oops. A similar DIY idea that many readers loved is our post about DIY Vertical Garden Ideas for Small Spaces.
Natural wood goes with pretty much everything, but if you’re painting, maybe take a look around first. I stick to colors that already exist somewhere in my space – it makes everything look intentional instead of random.
Rolling with the Seasons
One thing I love about pallet furniture is how adaptable it is. My outdoor seating setup can be rearranged for parties, and my planters look different throughout the year as I swap out seasonal plants. It’s like redecorating without spending money – my favorite kind of change!
In winter, I store the removable cushions and covers inside. Pro tip: if you live somewhere with harsh winters, think about how you’ll protect or store your creations.
Ready to Get Started?
Look, creative pallet projects are honestly some of the most rewarding DIY adventures you can go on. You’re saving money, helping the environment, and creating something totally unique for your space. Plus, there’s something super satisfying about turning someone else’s trash into your treasure.
Don’t overthink it – start with something simple like a planter or basic shelf. Once you get hooked (and trust me, you will), you can tackle the bigger stuff. Every wonky cut and imperfect finish just adds character, and honestly, that’s what makes handmade stuff so much cooler than store-bought.
I started with one little herb garden, and now half my house is furnished with pallet furniture. My friends think I’m obsessed, and you know what? They’re probably right. But when they see how amazing everything looks and hear what I spent (basically nothing), they all want to try it too.
So grab a pallet, dust off those power tools, and let’s turn your space into something amazing. Your wallet, your home, and the planet will thank you for it. And hey, if you mess up? Just call it “rustic charm” and move on!
Are pallets safe to use for indoor or outdoor décor projects?
They can be safe as long as you choose heat-treated pallets stamped with “HT.” Avoid chemically treated ones, as they may contain harmful substances. A quick clean, sanding, and sealing step helps make them ready for indoor or outdoor use.